Azure AD Authentication
Configuring an Application for Azure AD Authentication
Step 1: Register an Application in Azure AD
- Log into the Azure Portal:
- Go to Azure Portal.
- Navigate to Azure Active Directory:
- In the left-hand navigation pane, click Azure Active Directory.
- Create a New App Registration:
- Under Manage, select App registrations.
- Click + New registration at the top.
- Provide a Name for the app (e.g., "Umango Authentication").
- Under Supported account types, choose who can access the app:
- Accounts in this organizational directory only for single tenant apps.
- Accounts in any organizational directory and personal Microsoft accounts for multi-tenant apps.
- In Redirect URI, enter your application’s URL (e.g., http://umango-acme.com/dashboard/oauth2callback).
- Click Register.
Step 2: Configure API Permissions
- In the left-hand menu, select API Permissions.
- Click Add a permission, then choose Microsoft Graph.
- Under Delegated permissions, check the following permissions:
- openid
- profile
- User.Read
- User.Read.All
- Group.Read.All
- Click Add permissions.
Step 3: Create a Client Secret
- In the left-hand menu, select Certificates & secrets.
- Click + New client secret.
- Provide a description and set an expiration period.
- Click Add, and copy the Client Secret for use in your application configuration.
Step 4: Obtain the Application’s Credentials
- From the Overview page of your app registration, note down the Application (client) ID and Directory (tenant) ID.
- These values will be used in your application configuration.
Step 5: Configure Redirect URIs
- Under Authentication, scroll to the Redirect URIs section.
- Ensure that your app’s redirect URI is added here (e.g., http://umango-acme.com/dashboard/oauth2callback).
Step 6: Complete the Setup in Your Application
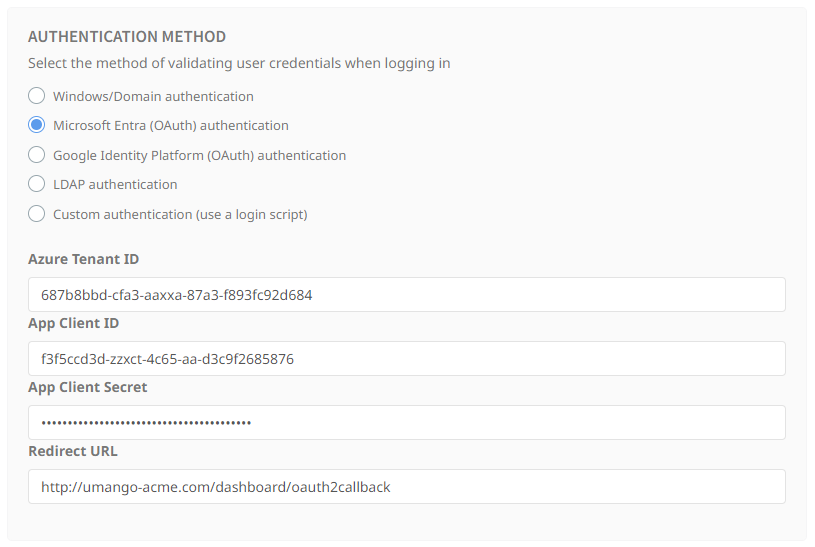
In your application’s configuration, enter the following details:
- Tenant ID: The Directory (tenant) ID from Azure AD.
- Client ID: The Application (client) ID from the Azure AD registration.
- Client Secret: The client secret you created.
- Redirect URI: The URL where Azure AD will send users after authentication. The domain should be the domain or hostname configured for your Umango server. The url should match the redirect url configured in your app exactly.
Step 7: Test the Authentication Flow
- Before navigating away from the Umango Authentication settings page, open a browser in incognito mode and attempt to sign in to Umango with your new Azure settings.
- Verify that the authentication flow works and that you are redirected back to Umango after logging in.
Common Troubleshooting Tips
- Ensure that the redirect URI in your Azure AD app registration matches exactly with what is configured in the Umango settings.
- Check that the Client ID, Client Secret, and Tenant ID are correct.