Google Authentication
Configuring Umango for Google Authentication
Users can login to Umango using corporate Google Workspace accounts. To do this, you need to create an authentication app in the Google Console and provide all the necessary permissions.
Step 1: Set Up a Project in the Google API Console
- Log into the Google API Console:
- Go to Google API Console.
- Create a New Project:
- In the top bar, click Select a project > New Project.
- Provide a name for your project (e.g., "Authentication") and click Create.
Step 2: Enable OAuth 2.0 Credentials
- In the left-hand menu, navigate to APIs & Services > Credentials.
- Click + Create Credentials and select OAuth 2.0 Client ID.
- Configure OAuth Consent Screen:
- Go to OAuth consent screen.
- Select External if your users include Google accounts from outside your organization.
- Fill in the required details (e.g., App name, support email, etc.), and click Save.
- Create OAuth Client ID:
- In Application Type, select Web Application.
- Provide a name for the OAuth client (e.g., "Umango Authentication").
- In Authorized redirect URIs, add the redirect URL for your app (e.g., https://umango-server-domain/oAuth2Callback).
- Click Create and copy the Client ID and Client Secret.
Step 3: Configure API Scopes
- After creating the OAuth 2.0 client ID, ensure to assign your app the API service Admin SDK API. The following scopes will be used by Umango:
- openid
- profile
- https://www.googleapis.com/auth/admin.directory.group.readonly
- https://www.googleapis.com/auth/admin.directory.user.readonly
- https://www.googleapis.com/auth/admin.directory.domain.readonly
- These scopes allow your app to access the user’s basic profile information and perform user and group related queries.
Step 4: Obtain OAuth Client Credentials
- In the Credentials tab, you’ll see the Client ID and Client Secret. Copy these for use in your application.
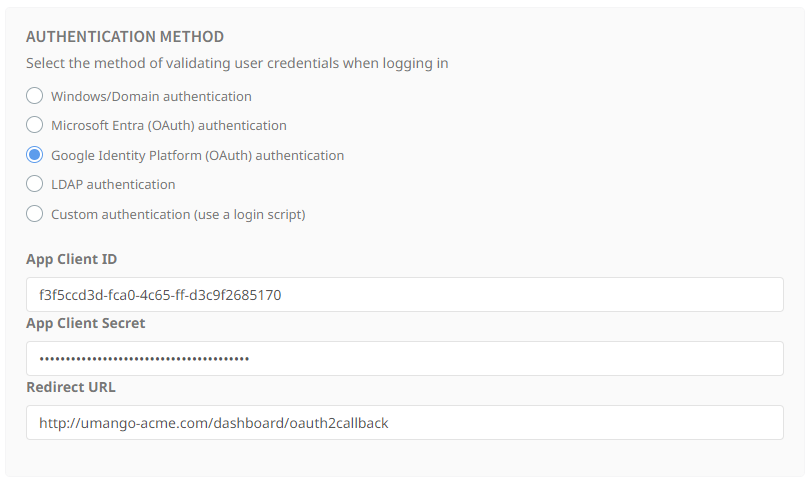
Step 5: Configure Your Application
In your application’s configuration, enter the following details and then press 'Save':
- Client ID: The OAuth 2.0 Client ID from the Google API Console.
- Client Secret: The OAuth 2.0 Client Secret.
- Redirect URI: The URL where Google will send users after authentication (e.g., http://umango-acme.com/dashboard/oauth2callback). The domain should be the domain or hostname configured for your Umango server. The url should match the redirect url configured in your app exactly.
Step 6: Test the Authentication Flow
- Before navigating away from the Umango Authentication settings page, open a browser in incognito mode and attempt to sign in to Umango with your new Google settings.
- Verify that the authentication flow works and that you are redirected back to Umango after logging in.
Common Troubleshooting Tips
- Make sure that the Authorized Redirect URI in Google’s API Console matches the URI configured in the Umango settings.
- Ensure that the OAuth consent screen is configured and verified, if necessary.