Web Request
The Web Request connector is an extremely flexible method for performing http requests to web based API's and REST services. These requests can be called when documents are exported or within Export Field Zones during processing. Requests can be stacked in a parent/child structure to enable multiple requests to be called where one is dependent on the result of a previous request.
This connector requires an understanding of web services and http request and response methods.

There are 3 types of web requests that can be configured. Each serves a slightly different function:
- Lookup Web Requests - Assigned to Export Field Zones, the lookup retrieves data from a web service and presents the results to a user during batch processing
- Export Web Requests - Called during document export events
- Parent Web Requests - Are called by child Lookup and/or Export Web Requests. These are requests that must preceded a prior requests. As an example, a parent request might be in an authentication request where a token is retrieved and used in a child request.
Settings
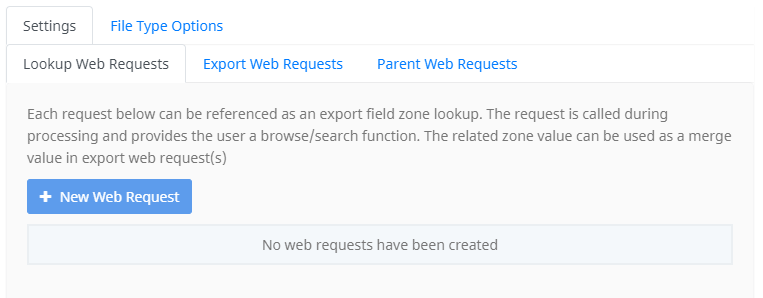
Lookup Web Requests

Lookup web requests are assigned to Export Field Zones. These requests are called during processing and provide the user a browse/search function. The related zone value is assigned the resulting value.
New Web Request
Click the New Web Request button to create a request.
When creating a new web request, consider whether you should first create an authentication request. If authentication is required prior to your lookup request can be called, then create a Parent Web Request that performs this task ready to assign it as a parent to this lookup request.
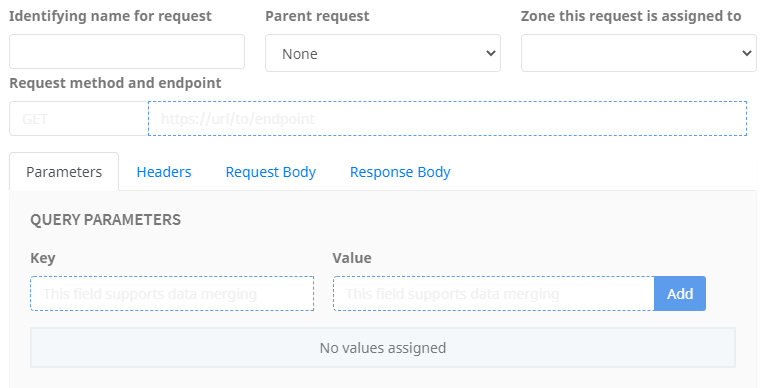
The steps to creating a web request are as follows:
- Enter an identifying name for request*. This serve no other purpose other than to make it easy to reference and understand its function later.
- Select a parent request (when required) from the drop-down list. The parent request will always be called prior to this request.
- Select the zone this request is assigned to from the drop-down list. During processing, this zone will trigger the request to perform a search.
- Select the request method from the drop-down menu (ex. GET, POST, DELETE etc) and then enter the request endpoint* in the merge field.
- Parameters: Using the related merge fields, enter key-value pairs of any required parameters. Once added, these will be listed below the fields.
- Headers: Using the related merge fields, enter key-value pairs of any required headers. Once added, these will be listed below the fields.
- Request Body: Configure a request body of the required type:
- None - No request body will be sent
- Binary file + form data - upload the file being exported together with key value pair form data
- Form data - upload key value pair form data
- Form url encoded - upload key value pair data url encoded
- Raw data/text - send a mergeable text body of your own structure (typically json or xml)
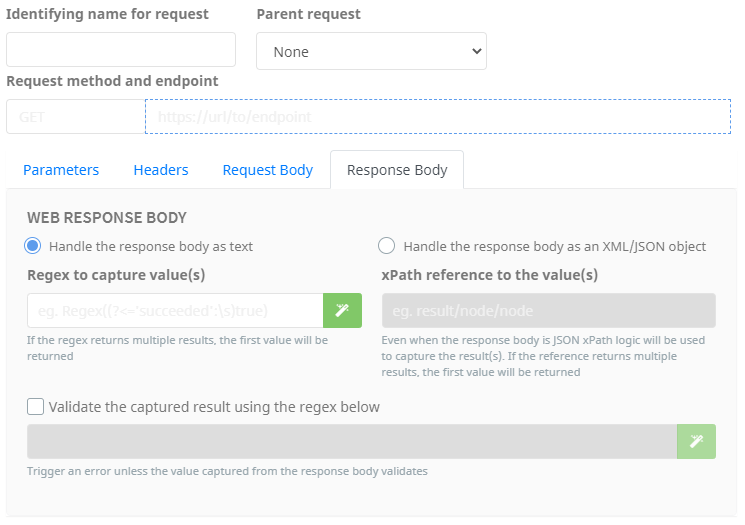
- Response Body: Choose how Umango will interpret the response body:
- As text - capture data with a regular expression. Enter the appropriate regex
- As an XML/JSON object - capture data with an appropriate xPath reference pointing to the element(s) to be returned
- Test the request by clicking the blue "Test" button. If the test is successful and the correct data should be displayed.
- Click OK. The request will now be included in the list of Lookup Web Requests.
*Required
Continue to add new requests as required.
Note that the sequence in which they are created and displayed in the list is the order the requests will be synchronously performed.
Export Web Requests

Export web requests are performed when a document is exported from a batch. This could be used to send the document or related data to populate into a server, etc.
New Web Request
Click the blue New Web Request button to create a request.
The steps to creating a new web request are as follows:
- Enter an identifying name for request*. This serve no other purpose other than to make it easy to reference and understand its function later.
- Select a parent request (when required) from the drop-down list. The parent request will always be called prior to this request.
- Select the request method from the drop-down menu (ex. GET, POST, DELETE etc) and then enter the request endpoint* in the merge field.
- Parameters: Using the related merge fields, enter key-value pairs of any required parameters. Once added, these will be listed below the fields.
- Headers: Using the related merge fields, enter key-value pairs of any required headers. Once added, these will be listed below the fields.
- Request Body: Configure a request body of the required type:
- None - No request body will be sent
- Binary file + form data - upload the file being exported together with key value pair form data
- Form data - upload key value pair form data
- Form url encoded - upload key value pair data url encoded
- Raw data/text - send a mergeable text body of your own structure (typically json or xml)
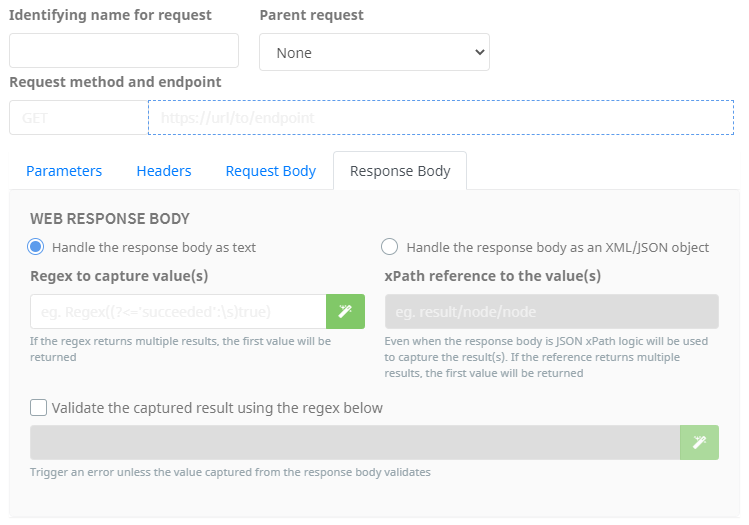
- Response Body: Choose how Umango will interpret the response body:
- As text - capture data with a regular expression. Enter the appropriate regex
- As an XML/JSON object - capture data with an appropriate xPath reference pointing to the element(s) to be returned
- To add a validation check to ensure the request was performed successfully, enable the option and provide a regex that will be used to validate the response body. If the regex does not return a result then the request will be interpreted as invalid and throw an error accordingly.
- Optionally, you can include http status codes that are acceptable results. If a status code is returned that is not in the comma separated list then an export error will be triggered.
- Test the request by clicking the blue "Test" button. If the test is successful the response body and validation result should be displayed.
- Click OK. The request will now be included in the list of Lookup Web Requests.
*Required
Continue to add new requests as required.
Note that the sequence in which they are created and displayed in the list is the order the requests will be synchronously performed.
Parent Web Requests

Parent Web requests are used to call requests prior to another request. These requests are only performed if they are referenced somewhere else.
New Web Request
Click the blue New Web Request button to create a request.
The steps to creating a new web request are as follows:
- Enter an identifying name for request*. This serve no other purpose other than to make it easy to reference and understand its function later.
- Select a parent request (when required) from the drop-down list. The parent request will always be called prior to this request.
- Select the request method from the drop-down menu (ex. GET, POST, DELETE etc) and then enter the request endpoint* in the merge field.
- Parameters: Using the related merge fields, enter key-value pairs of any required parameters. Once added, these will be listed below the fields.
- Headers: Using the related merge fields, enter key-value pairs of any required headers. Once added, these will be listed below the fields.
- Request Body: Configure a request body of the required type:
- None - No request body will be sent
- Form data - upload key value pair form data
- Form url encoded - upload key value pair data url encoded
- Raw data/text - send a mergeable text body of your own structure (typically json or xml)
- Response Body: Choose how Umango will interpret the response body:
- As text - capture data with a regular expression. Enter the appropriate regex
- As an XML/JSON object - capture data with an appropriate xPath reference pointing to the element(s) to be returned
- To add a validation check to ensure the request was performed successfully, enable the option and provide a regex that will be used to validate the response body. If the regex does not return a result then the request will be interpreted as invalid and throw an error accordingly.
- Test the request by clicking the blue "Test" button. If the test is successful the response body and validation result should be displayed.
- Click OK. The request will now be included in the list of Lookup Web Requests.
*Required
Continue to add new requests as required.
Note that the sequence in which they are created and displayed in the list is the order the requests will be synchronously performed.
File Type Options
File Type Options and related information are available here.