Batch Processing
Batch processing is the process of capturing and validating indexes and data. It occurs after a batch is created and must be completed before the batch is exported. It can be a fully automated process or very manual where a user is required every step of the way. The amount of user intervention required is dependent on the related job's Automation and Zone settings.
Batches can be processed in any of 3 ways:
- In a web browser (see below)
- On the panel of a supported multifunction device
- Automatically within job services (when full automation is enabled)
Processing in a Web Browser
Once you have scanned or imported documents into a batch, you may be prompted to process the documents. This will occur only if user intervention is required, in fully automated jobs, batches are processed and exported without user intervention.

Listing of Batches Currently in the System
By selecting the Process button for the related batch, the batch is opened and the user is presented with a processing screen. The user is stepped through each index where the value is displayed along with the related document and page region that is related to the zone.
To cancel, defer or finish a batch during processing, refer to the section on batch actions below.
Entering Index Values
As Umango progresses through the documents and zones within the batch, the system focuses on the relevant zone and automatically extracts data or requests operator input. The zone is displayed along with it's value for the user to confirm or enter data for the zone in focus.

Validating a Zone Value in a Browser
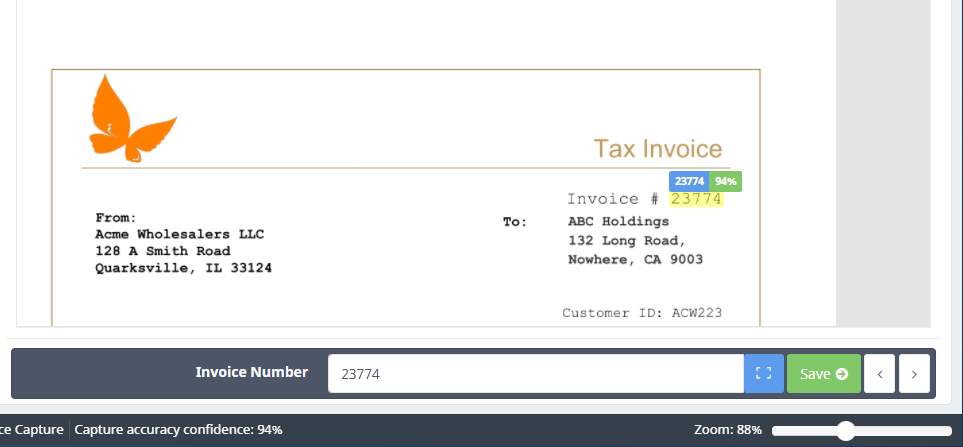
When processing, the current zone is highlighted and the zone profiling window shows the name of the zone and the related data. Enter or edit the value of the zone in the text area provided and then press the Save button. The lasso OCR tool can also be used during processing to capture text data directly from anywhere within the document.
The Lasso OCR Tool
If the information you want to enter into the index field is seen on the document, you can capture it by selecting the Lasso OCR button (seen below) and highlighting the text on the document. The test will then be populated into the zone value field ready to be saved.

The Lasso OCR Button
Saving Zones
Once the index's data is correct, press "Save" to proceed to the next zone. This process continues to the next document and then right through to the end of the Batch. When the processor arrives at the end of the Batch (all zones have been populated) the operator will be prompted to export the batch. To learn more about exporting a batch, read the section on Exporting a Batch.
Manipulating a Batch
There are numerous tools that are available during processing that assist this user in locating and extracting indexing data.
Zone and Document Selection
During processing the operator can move back and forward within a batch by clicking the zone and document selection buttons. This enables the user to move forward and backwards jumping by zone or by document.


Zone Selectors Buttons
The Index List
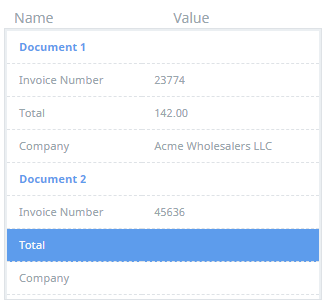
The index list displays all the batch's index that must be processed and populated. Navigating quickly across documents and between indexes can be achieved by selecting the required index. Once selected, Umango will display the related page, index zone and index value.

The Index List
Document Actions
The Document Actions Menu
Split
You can split a multi-page document into 2 separate documents. This is useful if a page separation has not been detected during scanning. The point of the split is based on the currently selected page within the current document. This selected page will become the first page of the new document and will be appended to the end of the current Batch.
Delete Document
The Delete Document button in the Actions menu provides document deletion based on the currently selected page, document and batch. This is permanent so act with caution!
Re-Assign
Documents can be re-assigned to another Batch during processing. This is helpful if a document has accidentally been scanned by the wrong job. A simple re-assignment leaves the document to be processed later by the correct Job settings.
Page Actions

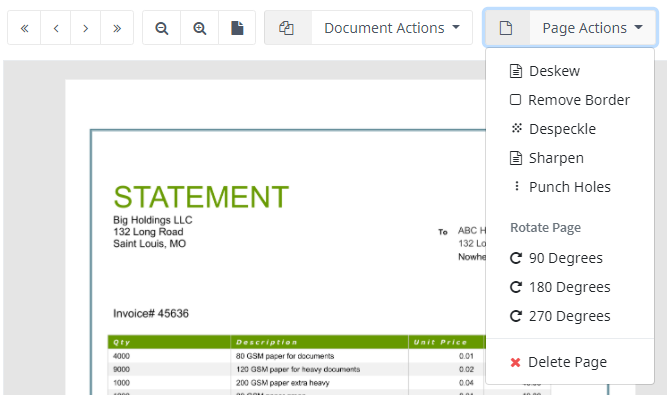
The Page Actions Menu
Deskew
When pages may have been poorly fed through the scanner and resulted in skewing, the deskew button will attempt to correct the page’s skew angle.
Remove Border
Where pages are found to have a black border surrounding the page, the page border correction will remove (make white) the border region.
Despeckle
If pages are found to be pitted with small dots as is often the case with poorly scanned the despeckle tool will attempt to remove the dots.
Sharpen
Enhances the definition of shape and text edges to improve readability of the page.
Punch Holes
Documents that are scanned after having been punch for ring binding are often found to have black holes on the left border. These black dots can be quickly removed with the punch hole tool.
Rotate
Pages can be rotated 90, 180 and 270 degrees in a clockwise direction. This feature is helpful if pages have been incorrectly fed into the scanner during scanning.
Delete Page
Delete the currently selected page from the document and page. This is permanent so act with caution!
Batch Actions

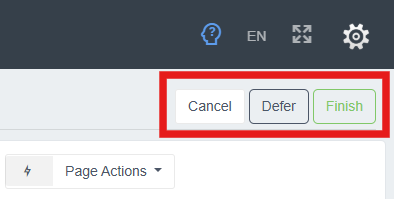
The Batch Action Buttons
Cancel
To delete the batch and all its documents and their data, select the Cancel button. This is permanent so act with caution!
Defer
At any time during processing, a user can select the Defer button to temporarily close the batch and resume it at a later time. This allows a batch to be progressively processed rather than all at once.
Finish
Once processing the batch is complete, click the green Finish button and send the batch off for processing.
